AI Homelab - A guide into hardware to software considerations

The AI landscape has expanded significantly and become increasingly fragmented. Nowadays, each commercial project has its own website, app, and discord bot. We’ve reached a point where testing on one’s own hardware often simplifies the process. Meanwhile, relying on “the cloud” can be cumbersome and costly, especially if you plan to run or train models regularly.
In this post I will explain my hardware choices, software considerations and give some general recommendations that allowed me to not only experiment on AI but also make the most of my homelab.
Hardware choices

In 2023, hardware prices remain steep. While there are deals to be found in the second-hand or refurbished markets, I’d advise caution. For instance, I’d be hesitant to purchase components like power supplies or RAM from these markets. Given that I live in France/Europe, the cost difference between new and used components for these specific items is minimal, making the savings hardly justifiable.
Nevertheless, you should explore your local market for components such as cases and motherboards (especially if they’ve been decommissioned or replaced by a company). Also, consider CPUs, these components aren’t typically in shortage. Since they don’t move around a lot, the likelihood of receiving a damaged one is slim.
Selecting the right hardware
What constitutes the “right” hardware can vary considerably between individuals. However, when it comes to AI workloads, especially training, there are several key factors to take into account:
Case
In order to fit all the hardware that you need, you will want at least an ATX compatible case or go for a 4U server if you already have some server-grade equipments. For my homelab I went with a Define R5 in order to not only fit the GPU but also many hard drives for the nas.
CPU
For the CPU the main issue is PCIe lanes, you don’t need a lot of cores for ML workloads but you definitely need the lanes between the ones allocated to NVME drives, network cards, GPU(s) it becomes very difficult to find consumer grade motherboards and CPU that can handle everything. If you’re setting up from scratch, a second-gen Threadripper is a noteworthy option. I went with an AMD Ryzen 5950x.
Motherboard
Your CPU choice inherently influences your motherboard options. This is why I previously highlighted the second-gen Threadripper for those seeking maximum PCIe lanes. It’s essential to recognize that 20 lanes can be limiting, and you don’t always have the flexibility to allocate these lanes as desired.
 |
|---|
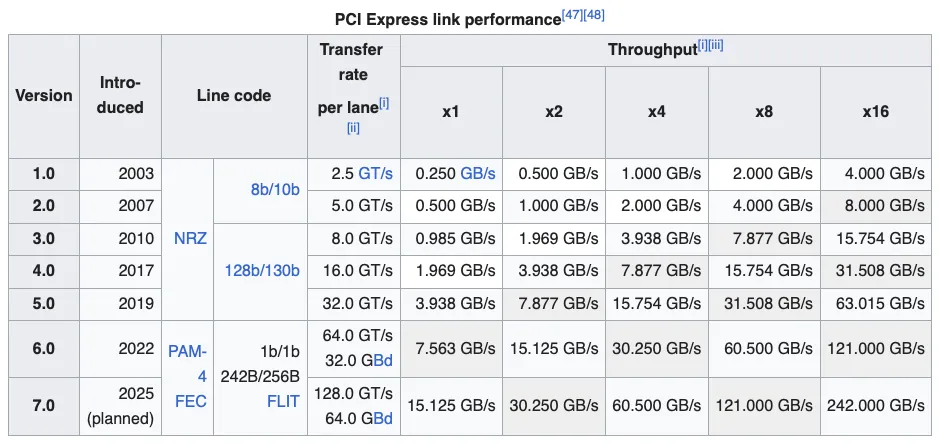
| PCI Express link performance |
The table above show the difference in throughput on consumer grade hardware. In my case I’m either using Gen4x16 for the first slot where my GPU is located or double Gen4x8 in case of two GPUs.
If you’re only looking at the throughput Gen4x8 is the “same” as Gen3x16 which many people still using for gaming purposes but you might run into some bottleneck if you need heavy parallelization.
Depending on your motherboard you might also have some features like a 10G NIC, Thunderbolt and better software support (more on that later on the software part).
I went with an ASRock X570 Taichi that has quite a robust support for virtualization and a decent balance on how the PCIe lanes are allocated.
GPU
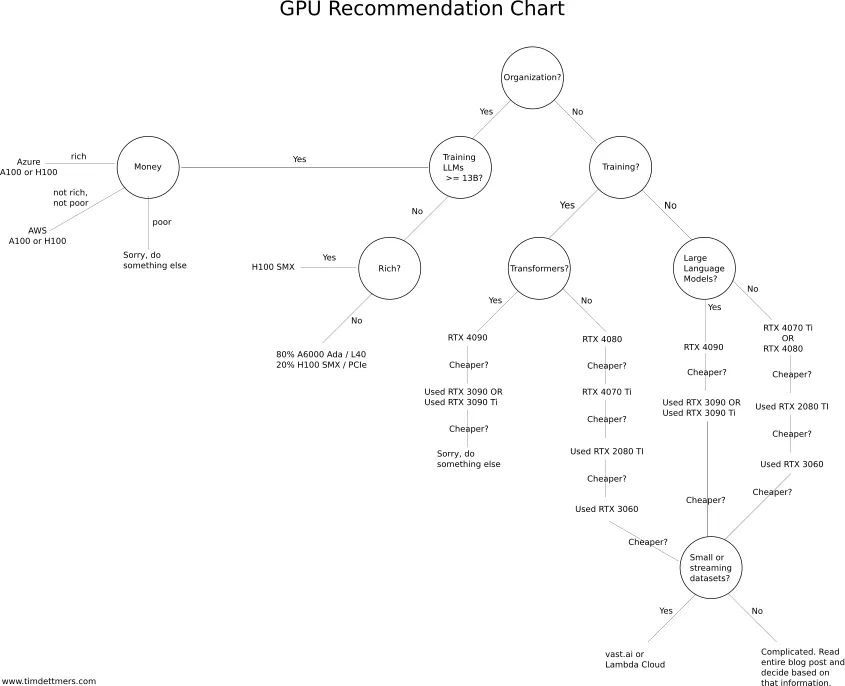
The first step into the GPU selection should be to read this excellent article by Tim Dettmers
 |
|---|
| GPU Recommendation Chart |
The hardest part of the GPU selection is actually to find one at MSRP let alone two or more unless you’re an organization or a startup affiliated with the Nvidia Inception Program.
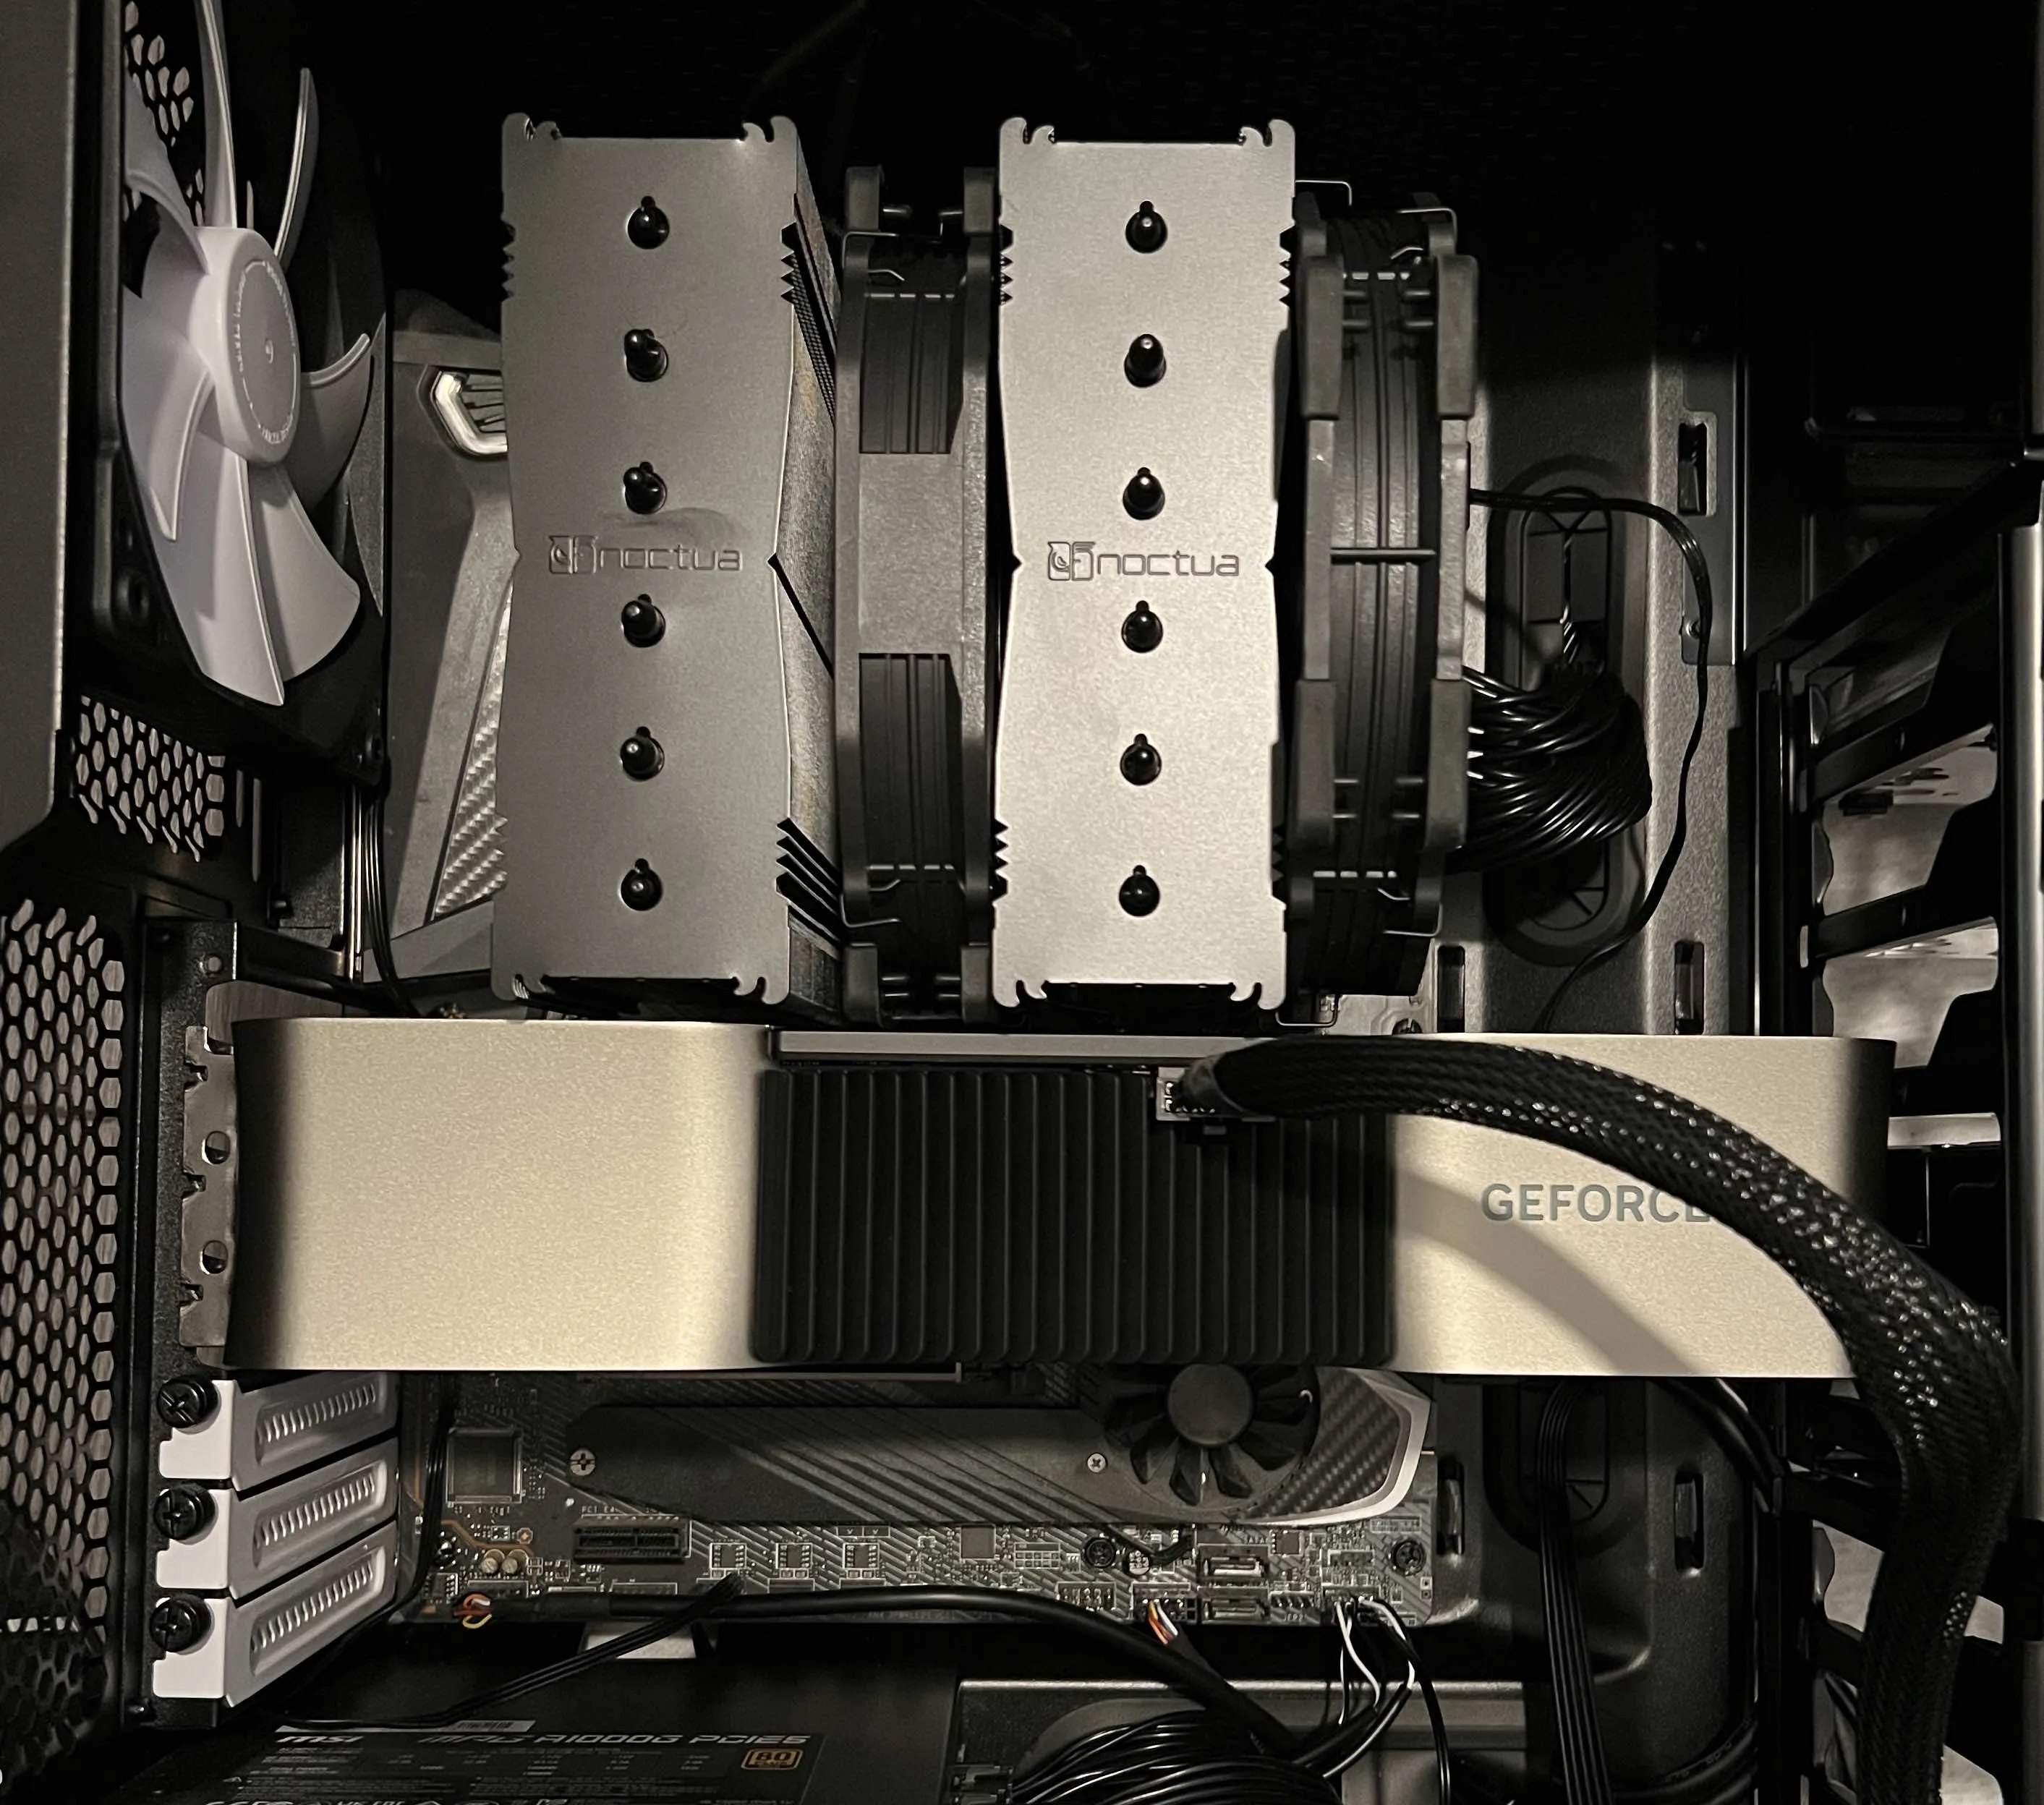
As a visual note, I would like to remind you that the RTX 4090 is massive and that the 12VHPWR connector should not be bent into extreme angles .
 |
|---|
| First test fit of the GPU |
Until this point I’ve only mentioned NVIDIA, that’s because ROCm and oneAPI have a very long way to go and other people like George Hotz, are trying to get AMD on MLPerf. While it’s promising for consumers to witness such competition, those engaged in serious work should prioritize the most stable hardware available, unless, of course, your hobby/work revolves around tinkering with drivers and software integration.
Other components
The other components should also be carefully selected, here is a non exhaustive list:
- RAM: AMD allows for ECC RAM, it is great for an always on server, check your motherboard QVL and forums for more informations
- Fans: High-quality fans can significantly reduce noise while delivering enhanced static pressure.
- Thermal Paste: The right thermal paste can help lower your system’s temperature by a few crucial degrees
- M.2 NVME: I allocated the first drive for Proxmox (covering the main OS, backups, and other VMs). I’ve dedicated a larger, second drive exclusively for the AI VM. It’s worth noting that adding multiple M.2 drives might disable or reduce the speed of some PCIe slots
- Hard Drives: As I also utilize the server for NAS purposes, I incorporated Seagate Exos drives. They’re known for reliability, though they can be a tad noisy during intense write operations
Noise, Heat & Power consumption
Noise tolerance varies among individuals, but I think many would agree: that hearing fans operate at full throttle during an ML workload is far from pleasant. If possible, relocate your server to a separate space, such as a well-ventilated closet or utility room.
For the power consumption, I have an Eve Energy Smart Plug and given the current electricity rates, my system averages around 1kWh per day at idle loads.
Software considerations
When it comes to software, individual requirements and preferences vary widely. However, if you’re running a multipurpose server, it’s highly beneficial to opt for a modular ecosystem. This should allow you the flexibility to easily launch, modify, and back up your services and applications. In my case I chose a T1 Hypervisor called Proxmox.
T1 Hypervisors
A type 1 hypervisor, also called as bare-metal hypervisor, runs on the host machine and this approach results in improved performance and security, given that your services remain isolated within individual VMs.
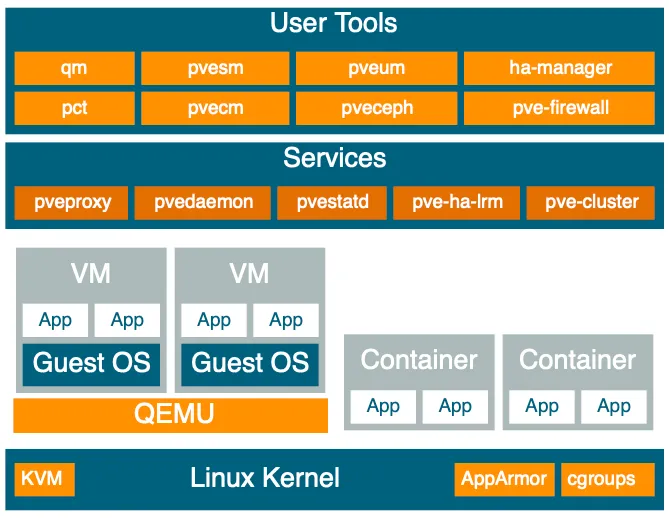
Proxmox Virtual Environment (PVE) is an open source server management platform that is quite popular in the homelab community. Its robust user base provides extensive documentation, and the standard version of Proxmox offers all the essential features required for remote VM management
GPU Passthrough
While I utilize Proxmox for passthrough of various devices, it’s essential to keep a few things in mind before diving into the setup:
- Set up the BIOS! As I mentioned on the hardware side, every motherboard is not suitable for a Proxmox setup, you need good IOMMU groups and that varies even between two motherboards in the same brand. As a general rule you should get the highest tier chipset available (like a X570 or X670e) or check out forums on this topic to find a decent motherboard
Here is the list of options I have enable or disabled:
Enabled:IOMMU, DMAr Support, Above 4G Decoding, Re-Size BAR
Disabled:CSM, Fast Boot, DMA Protection, PCIe ARI Support, AER CAP, Secure Boot, SR-IOV, Deep Sleep- Get the latest Proxmox VE 8 ISO
- Read the documentation, especially the “Prepare Installation Media” section. I had several installation fail post-install because the USB Key was corrupted or because I use Etcher instead of ‘dd’ and don’t hesitate to try other USB Keys!
- Update Proxmox, use clean scripts if needed
- Check PCIe devices
lspci -vv- Check if IOMMU is activated
dmesg | grep -e DMAR -e IOMMU -e AMD-Vi- Check IOMMU groups
If your GPU is in it’s own group (with it’s audio device) you’re all set to continue
find /sys/kernel/iommu_groups/ -type l- Read the documentation on GPU passthorugh.
There are not many steps left, some include adding vfio to the /etc/modules, updating initramfs, blacklisting nouveau/nvidia from the host
- Get Ubuntu Server and add it to the template folder
cd /var/lib/vz/template/isowget https://releases.ubuntu.com/22.04.3/ubuntu-22.04.3-live-server-amd64.iso- Create your first VM with the following main settings
Note: do not pass any GPU at first launch and configure properly the VM (also make sure to disable secure boot)
balloon: 0bios: ovmfboot: order=scsi0;ide2;net0cores: 12cpu: hostefidisk0: ssd:vm-100-disk-0,efitype=4m,pre-enrolled-keys=1,size=4Mhostpci0: xx:xx:xx,pcie=1,rombar=0,x-vga=1ide2: none,media=cdrommachine: q35memory: 81920meta: creation-qemu=8.0.2,ctime=xxxxname: ainet0: virtio=xx:xx:xx:xx:xx:xx,bridge=vmbr0,firewall=1numa: 0ostype: l26scsi0: ssd:vm-100-disk-1,backup=0,discard=on,iothread=1,size=3700G,ssd=1scsihw: virtio-scsi-singlesmbios1: uuid=xxxx-xxxx-xxxxsockets: 1vmgenid: xxxx-xxxx-xxxxDrivers: CUDA, CudNN
The most compatible version right now of CUDA is 11.8 since tensorflow and most of the projects out there have not been written with CUDA 12+ in mind. Here are the two links that you need to get started:
If you need even more isolation with multiple CUDA versions for your project you should check out NVIDIA NGC, a repository of containerized applications for multiple use cases like deep learning.
Remote access
While you could definetely deploy a Cloudflare tunnel like I showed in a previous post I decided to use Tailscale with the “Allow local network access” option in order to use the 192.168.X.XURL across all my devices without bothering to put more network infrastructure behind anything!
Conclusion
Throughout my AI journey, I noticed I was frequently toggling between apps/projects rather than genuinely engaging with them. It felt as though I wasn’t experimenting on my own terms. This realization drove me to create my own AI Homelab, which also doubles as a NAS. The initial decisions surrounding the right hardware and maximizing software utility can be intricate, influenced by factors like budget, personal preferences, and tolerance for noise and heat. Nonetheless, there’s a unique satisfaction in experimenting on a machine that truly belongs to you.
If you found this guide useful you can also check the previous ones about Setting up macOS for development and Abstracting local development environments through containers.